
In my sophomore year at Penn State, I built an electrocardiograph out of a PalmPilot as a hobby project. The signal amplification circuit is derived directly from plans at Jason Nguyen’s page. My contribution was to add the analog-to-digital converter and program the PalmPilot interface (as well as putting it all in a nice little enclosure).
 |
 |
Parts: The following parts wound up inside the electrocardiograph:
- One ECG amplification circuit built as described on Jason Nguyen’s page.
- PalmOS type handheld computing device with serial interface.
- Four AA batteries (or another way to come up with 6 volts on demand).
- A DBST (or DBDT) switch, a 1 MOhm potentiometer, and telephone wire + jack. These components are used as a power switch, gain controller, and easy way to connect the electrodes, respectively.
- One Pontech SV203 robot controller (or another way to get serial analog input, but this was the cheapest I found), details here. In hindsight, you might want an analog-to-digital converter that has a quicker refresh time. My results look good, but the slow refresh of the SV203’s analog input leads to temporal resolution inadequate for clinical interpretation.
- Serial null modem adapter and gender changer.
- A box, if you are so inclined.
Workspace: A cluttered workspace is necessary for getting anything accomplished. The image on the computer screen is Jason Nguyen’s ECG circuit; the small green chip you see attached to the cable on top of the composition book is the SV203. In front of the computer is the beginning of the ECG circuit. The second picture below also shows a generic toolkit and my borrowed oscilloscope, which is quite useful for debugging.

|
 |
Construction: Pictured here is the beginning of the ECG circuit, which I constructed on a standard breadboard. Below, you see the pennies soldered to electrode wires, which was the original electrode design that Jason Nguyen’s page suggested. Since then, I’ve upgraded to real (expired) ECG electrodes borrowed from my local EMS service, attached with alligator clips.

|
 |
It Works: This was the first time I got a successful signal, which you can see on the PalmPilot screen. At this point, I was still using my calculator’s battery pack for the 6V input…

In a Box: A double-pole single-throw switch is used to connect/disconnect the two power supplies, a 1 MOhm potentiometer to adjust the ECG gain, and a phone jack to connect the electrodes cleanly. The serial connection is for the PalmPilot connection.

|
 |
Inside the Box: So you can see how tightly it’s crammed… Soon the green chip will be secured to the top of the box via those standoffs.

|
 |
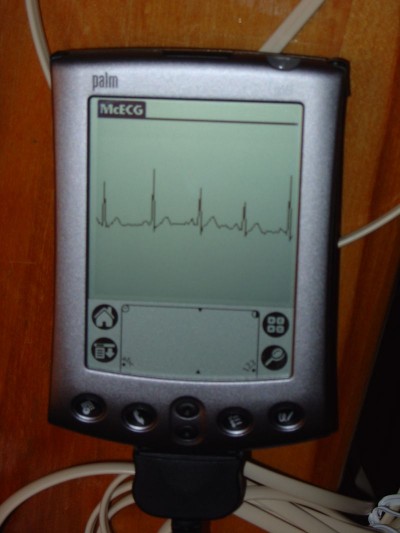
Got that Rhythm: This is one of the better rhythms it’s captured. It does a pretty consistent job so long as the electrodes are secured well and motion is minimal.

To Do: As I mentioned before, I did upgrade the electrodes to use alligator clips attached to disposable, expired ECG electrodes. If you have any questions thus far, they’re probably answered on Jason Nguyen’s page. One big thing I would recommend to anyone trying to build this is: 60 Hz noise leaks from everywhere! I was getting very bad signals when I had the PalmPilot laying on the metal body of my laptop, because the noise from the power supply would leak in and cause a corresponding 60 Hz wave. Be careful; stay safe; stay isolated.
Leave a Reply